Friday, 25 August 2017

Ink Sprays, Paint and Stencils

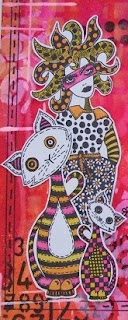
I love having time to get my paints and ink sprays out so my sisters birthday was the perfect excuse. We often get together and swap ideas over a cuppa, its funny how we like similar colours and designs and I wanted to make something personal.


I started with some Dylusion ink sprays that I bought from A Maze of Memories when I visited earlier in the year, I used the ghosting technique, then stenciled Dylusions paint through square, swirl and flower stencils.


The black spots and numbers were stamped using black archival ink once the ink and paint was dry. I doodled around the edge then added a few white lines with a piece of card dragged through white paint.


Dylusions produce colouring sheets and these images were trimmed (and coloured using zig pens) for detail on the front of the card along with a couple of birds that were swapped with a lady I met on my trip to Harrogate.


Two birds chatting!


The final piece mounted on a 7"x7" white card. Vibrant and a little crazy.


Wednesday, 23 August 2017

Golden Days

Few people celebrate their 50th Wedding Anniversary so it was a special occasion in our family when Mum and Dad celebrated theirs recently.


This photo was taken a few weeks earlier on a very hot afternoon while we waited for the food to cook on the bbq. We were laughing because they are wearing their scruffy allotment hats, not the sort you would usually wear in public.

The photo is mounted on gold card, the white card is embossed with rose buds and the golden rose voile on the right is stuck on using spray glue it is edged with a sparkly peel-off.


In the bottom corner the golden flowers were cut and embossed using dies from the Marianne Creatables range code LR0294 and LR0295 for the full rose and bud and LR0271 for the swirl which is one of two dies that were in the pack. All available from http://www.amom.co.uk/ A Maze of Memories.


Monday, 21 August 2017

Bunting!

I mentioned a while ago that I treated myself to a very nice sewing machine when I closed the shop (18 months ago, can you believe it!) I'm sure you will smile when I admit to buying many small pretty fabric pieces to use on my sewing projects but I'm saving them for something special!!


Well I decided to make some bunting for mum and dads anniversary, as a first project it went pretty well. Over several evenings I cut a few triangles, pinned them and couldn't wait to sew my first piece.


The fabric came from a scrap pack of off cuts I picked up on my travels. The pieces were random patterns but colour coordinated nicely.


Not sure whether the bunting would be used inside or out I left gaps so it could be looped over nails or tied easily over a banister.


I made paper flower templates then used the templates to cut out felt flowers and used them to personalise the bunting.


The stamps and pretty buttons can be purchased from http://www.amom.co.uk/


Can you believe I forgot to take a photo of the finished bunting!


Next time I visit I'll take a photo it looked lovely draped down the stairs and before the day was over there were several requests for Christmas bunting!

Saturday, 19 August 2017

Summer Colours

Wandering through the supermarket I spotted these pretty napkins with little orange and pink flowers. I couldn't resist!


After pulling the layers of napkin apart I used pva to stick the top layer of napkin onto an A4 sheet of card. Once dry I cut the napkin card into strips ready to decorate the front of my greeting cards.


I have a pot of little flower, leaf and plant pot stamps from my early crafting days. Choosing two designs and two ink colours I stamped columns of flowers to alternate between the napkin card strips then chose a large butterfly to finish the design.


Using Bubblegum Pink and Tangerine Dream ink sprays from the Dylusion range I sprayed a piece of A4 card, left it to dry then stamped a few Mosaic butterflies on top.


The butterflies were cut out and gently shaped, they make lovely embellishments and coordinate well with the napkin and stamping.


I think this is a nice design to make into a box of gift cards for someone special or you could make a little batch incase you need a card at short notice. Add a greeting, a few pearls or glitter depending on the occasion.


The Mosaic Butterfly Stamp and Dylusion ink sprays in Tangerine Dream and Bubblegum Pink were from my favourite craft shop http://www.amom.co.uk/ A Maze of Memories in Buckinghamshire.

Monday, 3 July 2017

Hampton Court Flower Show

I can't believe a year has passed since my visit to Hampton Court Flower Show. Colour and perfume from the flowers, music from the bands, hustle and bustle from the visitors, glistening fountains, picnics, it was a lovely day.


This was one of my favourite gardens, I love the selection of flowers and the cabinet of pots decorated with bunting, it looks so pretty. I have decided to use this picture for my next scrapbooking project.


Using one of Woodware's clear singles stamps "Bee Happy" JGS515 from a Maze of Memories I stamped a little off page to the left of my photo then cut around the right side of the image to hold the photo in place. On the right hand side I used one of my "old" Penny Black stamps, it's marked 1999! I cut around the left edge this time so I could slot the photo's in both sides.


Placing the images is important, if the two designs are too close you will buckle your photo so take care. 


The same stamps are used for the bottom photo and I have stamped and cut the flower tops so they fill in the dark gaps on the photo. If you have a go don't get carried away and cut the whole shapes out!


To work out spacing around the photo stamp the largest image first, hold the photo above the image and work out by eye where you are going to slot the photo in. Place the photo on top and mark the opposite edge with a pencil. When you stamp the second image (remove the photo) you have to stamp the image so it overlaps your pencil mark. Practice on scrap paper if you are unsure. 


Colouring is great fun, choose bright and bold or go pastel the nice thing is anything goes.


Did you notice the doodled border?


I will add lettering to say "Hampton Court Flower Show" then I might put the date on a watering can and hang it from one of the letters. A couple of bees or a butterfly a little glitter and it will be ready to put in my album.


Tuesday, 27 June 2017

Father's Day

Several years ago a few crafty ladies gathered over a cuppa to share their new stamps. Each lady took their own card, ink and 2/3 of their favourite stamps and we took it in turn to swap images. One particular design caught my eye and as Dad is a keen gardener I knew it would come in handy one day. Stamping the design twice I could make a layered picture when the time came.


This month wondering what card to make for Father's Day I came across the two images and set about colouring the first piece in pencils. As I worked I decided to cut out the middle area behind the cat saving the shelf, garden tools and little radio.


I used a knife to cut part way round the butterfly wings and folded them forwards. From the second piece I coloured and cut out the watering can, potted plant, shed notice and cats head. Layering all the pieces onto a brown piece of card gave a decoupaged look (Dad's favourite.)

We often have a family joke about the number of snails on the allotment so decorating the plain card with snails seemed the only option and raised a few smiles on the day!

Sunday, 25 June 2017

Pond Water

Nearly the end of June already - I have to tell you it's been a busy time including a visit to the Chelsea flower show, a trip to Harrogate, another to Rye, birthdays, Fathers Day, walks round a couple of beautiful gardens and a little crafting!

Do you remember the gorgeous pond water background papers I made from the distress oxide inks? I decided they were too busy for my frog photo's, I couldn't bare to cut into them so I have kept the cards for another day.

Plan B, I spotted some gorgeous frog card designs and stamps on http://www.amom.co.uk/ have a look on their blog archive for the month of April and you will see the full blog post, including lots of fab ideas.


I'm not very good at cropping my photo's and at the moment adding borders looks a bit 70's so until I master a more modern look I have decided to place plain photos on a double page, four full size photo's was too much so bravely I chopped into two so there is a focal point on each piece.


I set about stamping waterlilies and frogs around the photo's, there is a very cheeky looking chap top right, and I love the one who looks like he is dancing on a lily pad.


 On the bottom right corner this little chap looks like he is going to jump into the photo pond.


I did consider making a slider so a frog jumped across the page but this is going into a plastic sleeve so I decided against it. I also considered whether to cut out some lily pads and raise them over the edges around the bottom of the photo's but decided to use a few accent beads and a simple line of journaling at the top. I can always add to the pages as my scrapbooking experience increases.


To colour the images I used pencils and for the background I reached for a soft blue in my pan pastels but I don't have a blue! Out came an old chalk set.....I will tell you about them at the end of the blog. 


Can you see the accent beads? There is a little glitter added to the water and the bottom edges of the frogs so in day light they glistens as if they are wet. 


Carefully drizzling glue near but not on the photo's I have used Frantage flakes and fragments to resemble food given to the tadpoles and pond weed.


I'm so pleased with this set of stamps, it's one of those very "useable" sets perfect for male and childrens cards - lots of fun can be had adding a few balloons to one of the characters for example.


I journaled along the top edge and down the side of the page. It was one of those amazing evenings when the frogs were too content to dive under cover when I approached to take a photo.


This water lily stamp is a great design for a ladies card. I used it in the middle of my double scrap page.


Then filled in the background using the smaller set below.


I'm thrilled with my pages and hope to decorate a flowery page next time so I can add a few more embellishments.


I mentioned using an old chalk set to colour the background. Well after years of use many colours had crumbled under heavy use, I decided to clean the box. Carefully removing the colours from the box I then placed a piece of journal paper on top. Turned the tin upside down and emptied the small pieces of chalk and crumbs onto the journal page. Below, top left.


The box was wiped with a dry tissue and the larger pieces of chalk were placed back in the box. I carefully rubbed the crumbed chalk into two piece of journal paper to make two pretty backgrounds using what was basically waste for use at a later date.